martedì 29 settembre 2015

Creating Android TextView with custom font

This article demonstrates how to extend a TextView to use a custom font. We will add to the standard TextView an attribute font, that will be accessible either from xml or programmatically.

Create a new Android project and create in the values folder the attributes.xml file, in order to define the attribute font (this will be used in xml configuration).

<?xml version="1.0" encoding="utf-8"?>
<resources>
    <declare-styleable name="TextViewCustomFont">
        <attr name="font" format="string" />
    </declare-styleable>
</resources>

Then we need to extend the TextView class with our customization:

package com.devsourcenter;

import android.content.Context;
import android.content.res.AssetManager;
import android.content.res.TypedArray;
import android.graphics.Typeface;
import android.support.annotation.Nullable;
import android.util.AttributeSet;
import android.widget.TextView;

import com.devsourcenter.textviewwithcustomfont.R;

public class TextViewCustomFont extends TextView {

   public TextViewCustomFont(Context context, AttributeSet attributes) {
      super(context, attributes);
      // attributes variable contains all the attributes defined in the xml file

      // typedArray contains only the attribute specified by the resource TextViewCustomFont
      TypedArray typedArray = context.obtainStyledAttributes(attributes,
            R.styleable.TextViewCustomFont);
      // get the font attribute from xml
      String fontPath = typedArray
            .getString(R.styleable.TextViewCustomFont_font);

      // if the attribute is present it is set as font
      if (fontPath != null) {
         AssetManager assetManager = context.getResources().getAssets();
         // this is the object related to the font
         Typeface typeface = Typeface
               .createFromAsset(assetManager, fontPath);
         // now the assign the font to the TextView
         setTypeface(typeface);
         typedArray.recycle();
      }
   }

   /**
    * Assign the font in fontPath to the TextView
    * 
    * @param fontPath
    *            Path of the font file in assets folder
    */
   public void setFont(@Nullable String fontPath) {
      AssetManager assetManager = getContext().getResources().getAssets();
      Typeface typeface = Typeface.createFromAsset(assetManager, fontPath);
      setTypeface(typeface);
   }
}

The setFont method is used to set the font programmatically, while the constructor checks if the font is specified in the xml file. Now we can include TextViewCustomFont in our activity layout (activity_main.xml):

<LinearLayout xmlns:android="http://schemas.android.com/apk/res/android"
    xmlns:tools="http://schemas.android.com/tools"
    android:layout_width="match_parent"
    android:layout_height="match_parent"
    android:orientation="vertical"
    xmlns:app="http://schemas.android.com/apk/res/com.devsourcenter.textviewwithcustomfont"
    tools:context="com.devsourcenter.textviewwithcustomfont.MainActivity" >

    <!-- we set the font in xml with attribute font -->
    
    <com.devsourcenter.TextViewCustomFont
        android:layout_width="wrap_content"
        android:layout_height="wrap_content"
        app:font="fonts/palatino.ttf"
        android:text="@string/palatino"
        android:textSize="40sp" />

    <!-- in this view we set the font programmatically -->
    
    <com.devsourcenter.TextViewCustomFont
        android:id="@+id/courier_new_text_view"
        android:layout_width="wrap_content"
        android:layout_height="wrap_content"
        android:text="@string/courier_new" 
        android:textSize="40sp" />
        
</LinearLayout>

In the first TextView we set the font with the xml custom attribute font (we declared the namespace for the prefix app to use the attribute), otherwise the font of the second TextView is changed directly in the Activity:

package com.devsourcenter.textviewwithcustomfont;

import com.devsourcenter.TextViewCustomFont;

import android.app.Activity;
import android.os.Bundle;

public class MainActivity extends Activity {

   @Override
   protected void onCreate(Bundle savedInstanceState) {
      super.onCreate(savedInstanceState);
      setContentView(R.layout.activity_main);
      
      TextViewCustomFont customTextView = 
            (TextViewCustomFont) findViewById(R.id.courier_new_text_view);
      // set font programmatically
      customTextView.setFont("fonts/courierNew.ttf");
   }

}

As shown above we put the fonts courierNew.ttf and palatino.ttf in the assets/fonts folder. The running activity looks like this:


domenica 27 settembre 2015

Create Spring MVC project with Eclipse and Maven

In this tutorial we create a simple Spring MVC application using Eclipse and Apache Maven. The application let us to calculate area and perimeter of a rectangle, passing and receiving the data through a JSON. We will use Jackson to convert data from/to JSON, and we will deploy the generated war archive using Apache Tomcat.

First of all create a new project, select Maven project and press next:


Select maven-archetype-webapp:


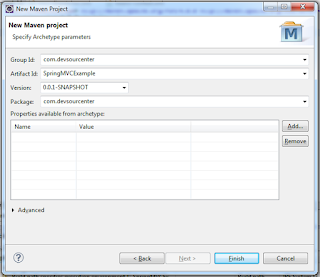
Configure the project:


Press finish to create the project. If you see error The superclass javax.servlet.http.HttpServlet was not found add Apache Tomcat to the runtime environments.


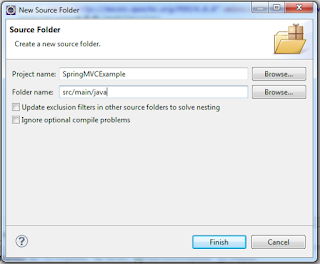
Create the source folder java:


You should add the dependencies in the pom.xml file, in order to load Spring framework and Jackson libraries:

<project xmlns:xsi="http://www.w3.org/2001/XMLSchema-instance" xmlns="http://maven.apache.org/POM/4.0.0" xsi:schemalocation="http://maven.apache.org/POM/4.0.0 http://maven.apache.org/maven-v4_0_0.xsd">
   <modelversion>4.0.0</modelversion>
   <groupid>com.devsourcenter</groupid>
   <artifactid>SpringMVCExample</artifactid>
   <packaging>war</packaging>
   <version>0.0.1-SNAPSHOT</version>
   <name>SpringMVCExample Maven Webapp</name>
   <url>http://maven.apache.org</url>
   <dependencies>
      <dependency>
         <groupid>org.springframework</groupid>
         <artifactid>spring-webmvc</artifactid>
         <version>4.1.4.RELEASE</version>
      </dependency>

      <dependency>
         <groupid>com.fasterxml.jackson.core</groupid>
         <artifactid>jackson-core</artifactid>
         <version>2.6.1</version>
      </dependency>

      <dependency>
         <groupid>com.fasterxml.jackson.core</groupid>
         <artifactid>jackson-databind</artifactid>
         <version>2.6.1</version>
      </dependency>
   </dependencies>
   <build>
      <finalname>SpringMVCExample</finalname>
   </build>
</project>

Create the mvc-dispatcher.xml file in the application classpath, in order to load the xml containing the beans definition. The tag <mvc:annotation-driven /> allows us to use the Java annotations in our controller.

<beans xmlns="http://www.springframework.org/schema/beans"
   xmlns:context="http://www.springframework.org/schema/context"
   xmlns:mvc="http://www.springframework.org/schema/mvc" xmlns:xsi="http://www.w3.org/2001/XMLSchema-instance"
   xmlns:util="http://www.springframework.org/schema/util"
   xsi:schemaLocation="http://www.springframework.org/schema/beans     
      http://www.springframework.org/schema/beans/spring-beans-4.0.xsd
      http://www.springframework.org/schema/mvc 
      http://www.springframework.org/schema/mvc/spring-mvc-4.0.xsd
      http://www.springframework.org/schema/util
      http://www.springframework.org/schema/util/spring-util-4.0.xsd
      http://www.springframework.org/schema/context 
      http://www.springframework.org/schema/context/spring-context-4.0.xsd">

   <mvc:annotation-driven /> 
   <import resource="classpath:beans-context.xml" />
</beans>

Create the beans-context.xml file in the application classpath, to register our Controller.

<beans xmlns="http://www.springframework.org/schema/beans"
   xmlns:context="http://www.springframework.org/schema/context"
   xmlns:cache="http://www.springframework.org/schema/cache" xmlns:util="http://www.springframework.org/schema/util"
   xmlns:infinispan="http://www.infinispan.org/schemas/spring" xmlns:p="http://www.springframework.org/schema/p"
   xmlns:xsi="http://www.w3.org/2001/XMLSchema-instance"
   xsi:schemaLocation="http://www.springframework.org/schema/beans     
      http://www.springframework.org/schema/beans/spring-beans-4.0.xsd
      http://www.springframework.org/schema/mvc 
      http://www.springframework.org/schema/mvc/spring-mvc-4.0.xsd
      http://www.springframework.org/schema/util
      http://www.springframework.org/schema/util/spring-util-4.0.xsd
      http://www.springframework.org/schema/context 
      http://www.springframework.org/schema/context/spring-context-4.0.xsd">
        
   <bean id="rectangleController" class="com.devsourcenter.controller.RectangleController" />
 
</beans>

Configure the DispatcherServlet and integrate Spring in web.xml

<web-app xmlns="http://java.sun.com/xml/ns/javaee" xmlns:xsi="http://www.w3.org/2001/XMLSchema-instance"
       xsi:schemaLocation="http://java.sun.com/xml/ns/javaee 
       http://java.sun.com/xml/ns/javaee/web-app_2_5.xsd"
       version="2.5">

   <display-name>SpringMVCExample</display-name>

   <servlet>
      <servlet-name>mvc-dispatcher</servlet-name>
      <servlet-class>org.springframework.web.servlet.DispatcherServlet</servlet-class>
         <init-param>
            <param-name>contextConfigLocation</param-name>
            <param-value>classpath:/mvc-dispatcher.xml</param-value>
         </init-param>
      <load-on-startup>1</load-on-startup>
   </servlet>

   <servlet-mapping>
      <servlet-name>mvc-dispatcher</servlet-name>
      <url-pattern>/</url-pattern>
   </servlet-mapping>
</web-app>

Now Spring is configured, so we can start coding. The Rectangle class will wrap the input data, while the Result class will contain output information:

package com.devsourcenter.model;

public class Rectangle {
   private Double length;
   private Double width;
   
   public Double getLength() {
      return length;
   }
   public void setLength(Double length) {
      this.length = length;
   }
   public Double getWidth() {
      return width;
   }
   public void setWidth(Double width) {
      this.width = width;
   }   
}

package com.devsourcenter.model;

public class Result {
   private Double area;
   private Double perimeter;
   
   public Double getArea() {
      return area;
   }
   public void setArea(Double area) {
      this.area = area;
   }
   public Double getPerimeter() {
      return perimeter;
   }
   public void setPerimeter(Double perimeter) {
      this.perimeter = perimeter;
   }
}

The RectangleController will receive input data and will return the result with area and perimeter. When input data is invalid the controller returns error 400.

package com.devsourcenter.controller;

import org.springframework.http.HttpStatus;
import org.springframework.http.ResponseEntity;
import org.springframework.web.bind.annotation.RequestBody;
import org.springframework.web.bind.annotation.RequestMapping;
import org.springframework.web.bind.annotation.RequestMethod;
import org.springframework.web.bind.annotation.ResponseBody;
import org.springframework.web.bind.annotation.RestController;

import com.devsourcenter.model.Rectangle;
import com.devsourcenter.model.Result;

@RestController
public class RectangleController {

   @RequestMapping(value = "/calculate", method = RequestMethod.POST)
   public @ResponseBody ResponseEntity<?> calculate(
         @RequestBody Rectangle rectangle) {
      // check if input data is invalid
      if (rectangle.getLength() == null 
            || rectangle.getLength() <= 0
            || rectangle.getWidth() == null 
            || rectangle.getWidth() <= 0) {
         return new ResponseEntity<HttpStatus>(HttpStatus.BAD_REQUEST);
      } else {
         // if data is valid calculate area and perimeter
         Result res = new Result();
         res.setArea(rectangle.getLength() * rectangle.getWidth());
         res.setPerimeter(2 * (rectangle.getLength() 
               + rectangle.getWidth()));
         
         // finally we return the result with status code 200
         return new ResponseEntity<Result>(res, HttpStatus.OK);
      }
   }
}

At this point our Application is complete, this is the final project directory structure:


We can launch the Application by right-clicking on the project SpringMVCExample and selecting Run As -> Run on Server. After that can perform a test making a PUT call to http://localhost:8080/SpringMVCExample/calculate and passing a valid JSON:


sabato 26 settembre 2015

How to hide projects in Eclipse

If you have a lot of projects opened in Eclipse workspace, then you may want to hide some of then. For example you have the projects ProjA, ProjB, ProjC and you want to show only ProjB. Let's see how we can do this: first of all you have to close the projects you want to hide, right-clicking on them and selecting Close Project as shown below.


Then under the View Menu you should select Filters (or Customize View or Filter is not listed)...


And finally check Closed project:


To reopen them again uncheck Closed projects, right click on them and select open project.


venerdì 25 settembre 2015

Static Factory Method in Java

In this post we explain how to encapsulate an entity into an object using the Static Factory Method in the Java language. Consider the scenario where you need to create a class to wrap a Java developer, the JavaDeveloper class contains the following fields:


Only name is mandatory, while salary, company, email and phone are optional. There are several ways to implement the JavaDeveloper class, but since we have one mandatory field and several optional fields, the static factory method is probably a good choice for our. So we can create the following class to implement the pattern:

public class JavaDeveloper {

   // required field
   private String name;

   // optional fields
   private Double salary;
   private String company;
   private String email;
   private String phone;

   // private constructor
   private JavaDeveloper(final String name) {
      this.name = name;
   }

   // static factory method
   public static JavaDeveloper create(final String name) {
      if (name == null) {
         throw new IllegalArgumentException("missing mandatory field");
      }

      return new JavaDeveloper(name);
   }

   // getters
   public String getName() {
      return name;
   }

   public Double getSalary() {
      return salary;
   }

   public String getCompany() {
      return company;
   }

   public String getEmail() {
      return email;
   }

   public String getPhone() {
      return phone;
   }

   // setters
   public JavaDeveloper setSalary(final Double salary) {
      this.salary = salary;
      return this;
   }

   public JavaDeveloper setCompany(final String company) {
      this.company = company;
      return this;
   }

   public JavaDeveloper setEmail(final String email) {
      this.email = email;
      return this;
   }

   public JavaDeveloper setPhone(final String phone) {
      this.phone = phone;
      return this;
   }
}

As you can see there is a private constructor, so the user can create an instance only with the factory method, passing the mandatory parameter. Getters are defined according to the JavaBeans specifications, while setters return the instance reference. In addition the instance returned from create can invoke directly a method, so you can easily set the optional fields using the method chaining:

JavaDeveloper dev = JavaDeveloper.create("Coyote")
                                 .setCompany("ACME")
                                 .setPhone("1234");

The disadvantage of this pattern is the impossibility to inherit the class developed, as only classes with public or protected constructors can be subclassed, so it's up to you to decide if this approach can be applied in your code.

domenica 20 settembre 2015

Customizing Android Spinner with custom layout and Enum values

In this article we will show how to customize the Android Spinner view using a custom layout and an Enum to bind the values. Suppose we want to represent a localized drop down list to let the user choose a color. Let's start by defining an interface to manage the color and the value of the Spinner:

package com.devsourcenter.customspinner.model;

import android.content.Context;

/**
 * Interface to manage the color and the value of the Spinner
 */
public interface IEnumSpinner {
    /**
     * Get the localized value of the Spinner
     *
     * @param context Context
     * @return The value of the Spinner
     */
    public String getLabel(Context context);

    /**
     * Get the color of the selected value
     *
     * @return The integer representation of the color
     */
    public int getColor();
}

Now we have to implement the interface in our Enum:

package com.devsourcenter.customspinner.model.enums;

import android.content.Context;
import android.graphics.Color;

import com.devsourcenter.customspinner.AppResources;
import com.devsourcenter.customspinner.R;
import com.devsourcenter.customspinner.model.IEnumSpinner;

/**
 * This Enum is used to represent a color
 */
public enum ColorEnum implements IEnumSpinner {
    RED(R.string.label_red),
    BLUE(R.string.label_blue),
    GREEN(R.string.label_green);

    /**
     * localized label key
     */
    private int key;

    private ColorEnum (int key) {
        this.key = key;
    }

    // we override toString() in order to translate the labels in the drop-down
    // list
    @Override
    public String toString() {
        return AppResources.getContext().getString(key);
    }

    public String getLabel(Context context) {
        return context.getResources().getString(key);
    }

    public int getColor() {
        switch (this) {
            case RED:
                return Color.rgb(255, 0, 0);
            case BLUE:
                return Color.rgb(0, 0, 255);
            case GREEN:
                return Color.rgb(0, 255, 0);
        }
        
        return -1;
    }
}

We need to implement an Application class to get the context in the toString() method of ColorEnum. In addition we also add the attribute android:name="AppResources" in the AndroidManifest.xml under the tag Application, in order to instantiate the class when the process for the application is created.

package com.devsourcenter.customspinner;

import android.app.Application;
import android.content.Context;

/**
 * Class used to get a context in any part of the app
 */
public class AppResources extends Application {

    private static Context mContext;

    @Override
    public void onCreate() {
        super.onCreate();
        mContext = this;
    }

    public static Context getContext() {
        return mContext;
    }
}


At this point we can implement the Adapter associated to the the Spinner. The holder pattern is used to increase performance:

package com.devsourcenter.customspinner.model.adapter;

import android.app.Activity;
import android.content.Context;
import android.view.LayoutInflater;
import android.view.View;
import android.view.ViewGroup;
import android.widget.ArrayAdapter;
import android.widget.TextView;

import com.devsourcenter.customspinner.R;
import com.devsourcenter.customspinner.model.IEnumSpinner;

/**
 * Adapter to fill Spinner with items
 */
public class EnumAdapter extends ArrayAdapter<IEnumSpinner> {
    Context mContext;
    int mLayoutResourceId;
    IEnumSpinner[] mItems;

    public EnumAdapter(Context context, int layoutResourceId,
            IEnumSpinner[] data) {
        super(context, layoutResourceId, data);
        this.mLayoutResourceId = layoutResourceId;
        this.mContext = context;
        this.mItems = data;
    }

    @Override
    public View getView(int position, View convertView, ViewGroup parent) {
        View row = convertView;
        Holder holder;

        if (row == null) {
            // at this point we inflate the view with our custom layout
            LayoutInflater inflater = ((Activity) mContext).getLayoutInflater();
            row = inflater.inflate(mLayoutResourceId, parent, false);

            holder = new Holder();
            holder.txtTitle = (TextView) row
                    .findViewById(R.id.textView_spinner);

            row.setTag(holder);
        } else {
            holder = (Holder) row.getTag();
        }

        IEnumSpinner item = mItems[position];
        holder.txtTitle.setText(item.getLabel(mContext));
        holder.txtTitle.setTextColor(item.getColor());
        return row;
    }

    static class Holder {
        TextView txtTitle;
    }
}


Finally we can create the Activity to include the Spinner:

package com.devsourcenter.customspinner;

import android.app.Activity;
import android.os.Bundle;
import android.view.View;
import android.widget.AdapterView;
import android.widget.Spinner;
import android.widget.Toast;

import com.devsourcenter.customspinner.model.adapter.EnumAdapter;
import com.devsourcenter.customspinner.model.enums.ColorEnum;

public class MainActivity extends Activity {

    private EnumAdapter mColorAdapter;
    private Spinner mSpinnerColor;

    @Override
    protected void onCreate(Bundle savedInstanceState) {
        super.onCreate(savedInstanceState);
        setContentView(R.layout.activity_main);

        mColorAdapter = new EnumAdapter(this, R.layout.spinner_layout,
                ColorEnum.values());
        mSpinnerColor = (Spinner) findViewById(R.id.spinner_color);
        mSpinnerColor.setAdapter(mColorAdapter);
        mSpinnerColor
                .setOnItemSelectedListener(new AdapterView.OnItemSelectedListener() {
                    @Override
                    public void onItemSelected(AdapterView<?> parent,
                            View view, int position, long id) {
                        // get the enum selected
                        ColorEnum color = (ColorEnum) parent
                                .getItemAtPosition(position);

                        Toast.makeText(MainActivity.this,
                                color.getLabel(MainActivity.this),
                                Toast.LENGTH_LONG).show();

                        // do whatever you want
                    }

                    @Override
                    public void onNothingSelected(AdapterView<?> parent) {

                    }
                });
    }

}


We used this simple layout for the Activity (activity_main.xml):

<LinearLayout xmlns:android="http://schemas.android.com/apk/res/android"
    xmlns:tools="http://schemas.android.com/tools"
    android:layout_width="match_parent"
    android:layout_height="match_parent"
    android:orientation="horizontal"
    tools:context="com.devsourcenter.customspinner.MainActivity" >

    <TextView
        android:layout_width="wrap_content"
        android:layout_height="wrap_content"
        android:padding="10dp"
        android:text="@string/label_choose"
        android:textAppearance="?android:attr/textAppearanceLarge" />

    <Spinner
        android:id="@+id/spinner_color"
        android:layout_width="wrap_content"
        android:layout_height="wrap_content" />

</LinearLayout>


And this is the layout for the Spinner (spinner_layout.xml):

<?xml version="1.0" encoding="utf-8"?>
<TextView xmlns:android="http://schemas.android.com/apk/res/android"
    android:id="@+id/textView_spinner"
    android:textAppearance="?android:attr/textAppearanceLarge"
    android:padding="7dp"
    android:layout_width="wrap_content"
    android:layout_height="wrap_content" >
    

</TextView>


We also provided translated enum labels for English:

<?xml version="1.0" encoding="utf-8"?>
<resources>
    <string name="app_name">CustomSpinner</string>
    <string name="label_choose">Choose a color:</string>
    
    <string name="label_red">Red</string>
    <string name="label_blue">Blue</string>
    <string name="label_green">Green</string>
</resources>


Italian:

<?xml version="1.0" encoding="utf-8"?>
<resources>
    <string name="label_red">Rosso</string>
    <string name="label_blue">Blu</string>
    <string name="label_green">Verde</string>
</resources>


and French:

<?xml version="1.0" encoding="utf-8"?>
<resources>
    <string name="label_red">Rouge</string>
    <string name="label_blue">Bleu</string>
    <string name="label_green">Vert</string>
</resources>


Here is the result:


So you can simply define your Enum and your spinner_layout.xml to customize a Spinner.